Category Archives: Patchwork Projects

‘Strippy Steps’ is Finished!

Finally finished it. This one was begun on the Ballan Retreat and adapted from a class pattern by Pauline Baber at Patchworks Unlimited.

Kaffe Fasset fabrics

Strip sets laid out on the floor.

Varying widths of strips of Kaffe Fasset fabrics were sewn to a wash away interfacing, using the flip and sew method. Trimmed back to a uniform rectangular shape, the original pattern had them laid out in a chevron row. I thought it could have a better visual design by staggering the blocks, so laid them out on the floor. You know when you get that niggly feeling that it’s not quite right, (that’s usually when a project goes into the UFO pile), so I walked around it, and then went away from it for a while.

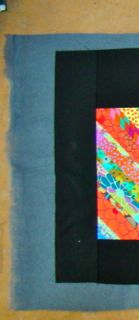
A fellow Pascoe Patcher (Sue C)’s passing comment, about Kaffe Fasset fabrics always looking good against black, led to the ‘aha’ moment! So off to the Millrose Cottage next door for some black fabric. So that’s where it stopped at Retreat.

Back home, of course work and normal activity slows down the sewing so it took a while to get back to working on this project (amongst others). How far apart to separate the rectangles, and stagger them up or down, was decided by using Jinny Beyers Golden Gauge Calipers – what a neat gadget. It takes the guess work out of proportions and consequently there is no subconscious niggle when viewing the quilt, that the spacing is not quite right.

Golden Gauge Calipers

Jinny Beyer’s Golden Gauge Calipers

Added a small rectangle to the top or bottom of each rectangle, then a sashing in between to join them together, followed by a border all around. As it is a dark top, a grey wadding/batting was needed.

'Strippy Steps' 02

Grey wadding for the dark top instead of white.

What quilting design to use for this piece was a challenge. With a strong geometric and straight line pattern nothing curved or floral would suit it, so what to do? As Deb Layt says, ‘Let the quilt tell you’, so over a few days of just looking at it came the decision to extend some of the straight lines from the stripes out to the edges. Along the top border going in one direction, and on the lower border, going the opposite direction with nothing crossing over.

'Strippy Steps' 06

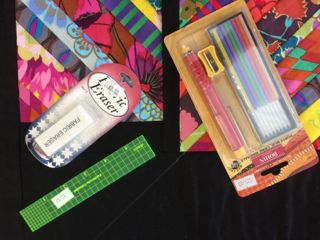
Bohn Chalk Pencil, small ruler, and fabric eraser.

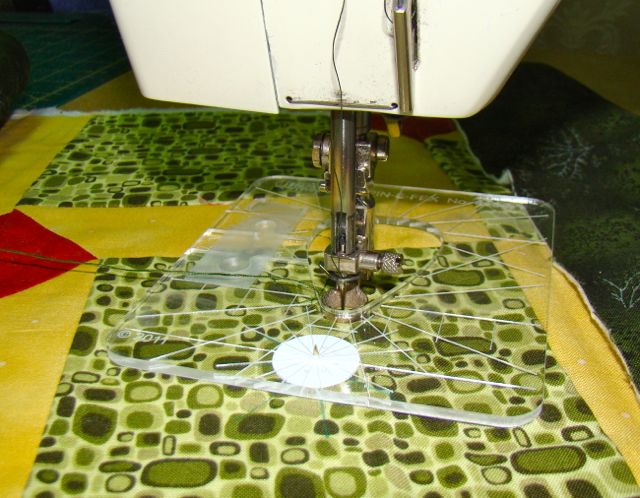
Using a chalk pencil to mark the quilt, and sewing with Wonderfil’s Spagetti 12wt black thread on a black fabric, even under lights, takes concentration.

Marking a quilt top

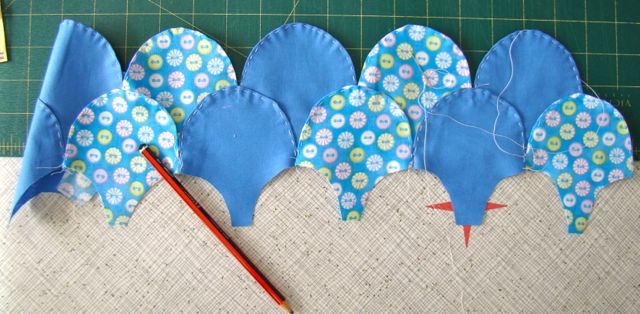
Chalk quilting lines.

Binding done … and it’s finished! Although originally a table runner, DH thought it looked better as a wall hanging – so now there’s a hanging sleeve to put on – if only he had said that before I did the binding! Anyway, it’s another one to tick off the list!
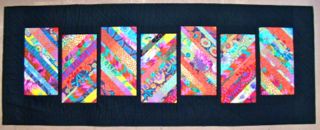
'Strippy Steps'  is finished

Completed quilt.

I rather like this one, bright and bold, hope you do too.

RobynsPatch

Are we clammed out yet?

Clamshells, clamshells, clamshells ……….

Australian ‘International Tutor’, Irene Blanck of ‘Focus on Quilts’, taught a class at Patchworks Unlimited, demonstrating her easy method of sewing clamshells. No papers, no backing fabric, no grid, so simple. Using template plastic to draw the clamshells, basting the turned edge and basting together, results in a portable block of clamshells. Irene’s encouraging and informative teaching soon had everyone tracing, cutting, folding and stitching amidst concentration, conversation and laughter!

Irene Blanck Focus on Quilts

Irene Blanck’s demonstration clamshells.

Donna’s cute fabrics include a couple of clamshells with a background textured thread that just asks to be finger tip touched – very tactile. Love the fussy cut ladybird! When the next row is added it will ‘peep’ out, or emerge, from between the clams.

Irene Blanck Focus on Quilts

Donna’s array

Joy chose to use two fabrics in a one colour, staggering the clamshells. This will give movement across the quilt making a trail for the eye to follow.

Irene Blanck Focus on Quilts

Joy’s blues.

My eclectic scrappy mix includes a row of black to make the clamshells pop. This is one of Irene’s suggested layouts. Seems to me, when I see my own work in photos, that I have a patchwork ‘style’ of high contrast and bright colours!

Irene Blanck Focus on Quilts

Robyn’s alternate rows layout

Sheryl went way out of her comfort zone with these fabrics, so the soft colours are going to be lifted with a few darker shades to add depth and variety.

Irene Blanck Focus on Quilts

Sheryl’s original second row is the pale grey.

Ann’s houses are carefully cut out to ensure they are visually horizontal. Even a small incline, or a pattern off kilter, will give the viewer an unconscious niggle that something’s not quite right.

Irene Blanck Focus on Quilts

Ann’s bright clamshells.

Mary also chose to have a go at the alternate row layout with these creams and shaded colours. The Karen Kay Buckley scissors are a dream to use for cutting out the clamshells in fabric.

Irene Blanck Focus on Quilts

Mary’s alternate row layout.

By putting in some vintage prints, Moira has added both depth and places for the eye to rest as the quilt is viewed. Like Ann’s houses and Donna’s ladybird, the check fabric is fussy cut to keep the pattern vertical and horizontal.

Irene Blanck Focus on Quilts

Moira’s vintage fabrics.

Marcia chose bright coloured fabrics of clear and defined patterns, and set them against a row of grey. This style gives lots of ‘I Spy’ spots to discover as you look at the quilt.

Irene Blanck Focus on Quilts

Marcia’s alternate row layout.

Karin’s quilt has the wow factor of traditional red and black, with modern grey linking the two together. Careful placement of the red will catch attention to the quilt. Karin’s using Paula Storm‘s new appliqué needles (in the cute little bottle), and experimenting with Wonderfil’s ‘Deco-Bob’ thread to appliqué the clamshells together.

Irene Blanck Focus on Quilts

Karin’s glam clams.

Debbie’s scrappy quilt has her clamshells made from batiks. This will be a richly coloured quilt, and the finely woven fabric is very easy to appliqué.

Irene Blanck Focus on Quilts

Debbie whipstitching clams together.

Winner of the ‘Quiet Achiever Award’ goes to our hand stitching extraordinaire …. Angela! These perfectly pieced ‘French General’ clamshells came together before any of us had time to thread a needle! (Sorry about the shadow – the sun came out from behind just as the photo was taken.)

Irene Blanck Focus on Quilts

Angela’s ‘soldiers’ all in a line.

Oooops …! Don’t do what Donna did … Just as well it was close to finishing time, well after having made the clamshells.

Irene Blanck Focus on Quilts.

Donna sewed her finger to the clamshells – ouch!

Irene concluded her lesson with advice on layouts, quilting, borders and labels. Her alternate row sample has machine quilting,

Irene Blanck Focus on Fabric

Irene’s alternate rows.

whilst her ‘scrappy’ version is hand quilted in a utility stitch using Perle 8 cotton thread.

Irene Blank Focus on Quilts

Irene’s hand quilting.

Irene is well known for her needle-turn appliqué and her love of fabric printed with text, which she incorporates into her quilts. She is now the proud author of her first book, published by Quiltmania.

Irene Blanck Focus on Quilts.

‘Focus on Applique’ by Irene Blanck

Phew! A marathon blog! I’m glad you stayed the distance!

Hope you’ve enjoyed seeing what participants can enjoy and achieve in Irene Blanck’s ‘Clamshell’ class.

Till next time, 

RobynsPatch

‘Crooked Path’ – ’tis finished!

Time to get back to what’s been happening with the ‘Crooked Path’ table runner. It took some time to get used to the Westalee template and ruler foot, as I found it easier to do them a few at a time, and not be ambitious in ‘getting it all done now!’ I improved over time, gradually getting the hang of it, and can see how it fits in between using a walking foot and free motion quilting.

Crooked Path

Completed quilting with the Westalee ruler foot ‘Spin-e-fex’ motif.

I needed to unpick a few of the ‘petals’ that had got ‘squished’, and a couple of the inner circles (that are formed as the template turns around on the pin), as they were more like mountains and valleys. With persistence each square patch had the pattern quilted on it. However a few of the circles were still a bit wobbly, which I would notice but others may not – and I was over the unpicking, so what to do? Simple, appliqué a circle over the centre of each square! After all it does look like a ‘flower’.

Crooked Path

Centre circles – colour choices.

After auditioning fabrics from the stash, it came down to only a couple of pieces. The strong pattern of the squares, along with the yellow background and contrasting red, clashed with so many choices. So these were it. Next was what sizes and which colour to put where – and another day went by.

Crooked Path

Inner circles glued down ready for appliqué

‘Roxanne Glue Baste It’ kept the circles in place until I had time to start the appliqué. I chose to use a matching thread and a narrow zig zag on the Bernina 801.

Crooked Path

‘Crooked Path’ appliquéd centres.

An unexpected effect was that the circles tended to ‘puff’ up – possibly due to all the quilting underneath them, flattening the lower layers.

Crooked Path

Crooked Path

Well, ‘Crooked Path’ began as a pattern for International Quilt Day (seen by chance while wandering the web), and ended up as a gift for a special lady. I’ve enjoyed making this table runner, juggling the choices along the way. And it’s sooooo good, knowing that I’ve actually finished something – and on time – instead of it going into the bottomless pit of ‘UFO’s’!

I hope you too are joining me in this slow journey, and stitching to ‘get it finished’!

RobynsPatch


‘Crooked Path’: Spin-e-fex quilting

Quilt marking

Frixion pen for quilt marking

I use the ‘Frixion’ pens for making marks to guide any quilting. So far, through testing, I’ve found that the best colour for the majority of fabrics is the green pen. Any of these pens will still leave a ‘ghost’ line after ironing out, so always test them out on a scrap of the fabric to see if will be feint or too noticeable. When any stitching is directly on the line, the ‘ghost’ line will not show at all.

Westalee Adjustment Guide

Adjustment guide for ruler foot

With the ‘Westalee Ruler Foot’ on the Bernina 801 sewing machine, the ‘adjustment’ guide positions the foot distance above the quilt. This needs to be done for each quilt, as the thickness of the wadding used will vary according to the type chosen  in the quilt sandwich.

Spin-e-fex template

Spin-e-fex template pinned in place

The drawing pin and disk hold the template in place, and the template lines align with the marked lines on the quilt top. For this one, I chose to draw the lines in the centre of the block instead of around the outside edge of the block. Another tip – use a large thick pin to prepare the hole for the drawing pin from the top of the quilt. I found that pushing the drawing pin from underneath pushed up a little ‘plug’ of wadding. As this is the first time I’ve used this method, it could be the type of wadding.

Quilting around the template

Quilting around the template

This was not as easy as it looked! Stitching around the edge of the template was okay, but coordinating the clockwise movement of the template, the quilt, and stitching – all at the same time, took some ‘learning’ and initially lots of ‘reverse sewing’!

Completed Spin-e-fex

Completed Spin-e-fex

The inner circle formed as the ‘Spin-e-fex’ takes shape had mountains and valleys instead of a line. Although it took time to set up each block, it was satisfying to do and I could see improvement as I quilted more blocks.

I’ve decided to leave them as is, and think about what to do next.

RobynsPatch